11 min read
How to turn a photo into a 3D model
How to turn a photo into a 3D model: which photo to use, how to check the sides the camera never saw, the files you get and the limits.
By Jorge Rodríguez
On this page
To turn a photo into a 3D model, take one sharp, evenly lit photo of a single object and give it to an image-to-3D tool, which predicts the sides the camera did not see. Photogrammetry is the other route: it needs at least 20 overlapping photos taken all the way round. Either way, the photo decides most of the result.
How to make a 3D model from photos: one photo or many?
The number of photos follows from one question: is the object in front of you? Photogrammetry and LiDAR scanning need it there. Image-to-3D only needs a picture, which is why it is the route for a supplier's shot of a sideboard you have never touched.
Photogrammetry stitches overlapping photos into a model. Polycam asks for at least 20, with about 70% overlap, and detailed objects need 100 or more. RealityScan starts analysing after 20 images, takes up to 300, and asks for circles and arches at several heights.
LiDAR, on an iPhone Pro or iPad Pro, measures depth as you walk round the piece. It is quick on big, plain shapes and loses fine detail such as turned spindles.
Photogrammetry
Needs: The object in front of you
Taken all the way round it
Each surface from 2+ shots
Real detail, if the camera reached it
Image-to-3D
Needs: One photo, even a supplier’s
Sharp, plain background
Check those sides in the preview
The photo did not show that side
This is how we would choose, case by case:
- Supplier photo only, the piece in a warehouse abroad: image-to-3D, because nothing else can start.
- The piece in your stockroom, a textured surface like oak or linen, an hour free: photogrammetry. It records the real surface instead of predicting it.
- A large, plain piece like a three-seat sofa, with a Pro iPhone to hand: LiDAR. It is fast, and the shape matters more than the weave.
- Glass, mirror or polished chrome: none of them works well, because each one reads reflections as surface.
The trade-offs between many photos and one photo are in photogrammetry software vs one-photo AI.
How does image to 3D work?
Tools work in one of two ways. Some go straight from the photo to a model. Others first draw the object from several angles and then build the model from those views, which gives the build more to go on for the hidden sides.
easyrender uses the second route. We chose it after an A/B run on real listings. That run used a larger image model for the sheet; the sheet is now drawn by a cheaper one that we have not yet tested the same way.
The first stage is the angle sheet: one square image, split into a 3 by 3 grid.
Eight cells circle the object in 45-degree steps, from the front round to front-left, and the ninth looks straight down. Every cell is on plain white, in soft light, with the whole object centred. The second stage reads your photo and those nine views and builds one textured mesh.
Preview
The whole object, three-quarter angle
The object drawn from several sides
Back, sides and top, which the photo did not show
Model
Textured mesh from those views
Web and Android, iPhone and iPad
Looks wrong at step 3: change the photo, not the settings.
The prediction is good at overall shape and colour and weak at what one photo cannot show, like what sits behind an open weave. It also leans on symmetry. Our default instructions tell the model to infer a hidden side conservatively from the visible construction, and never to invent logos, text or decoration.
For furniture we add rules of our own, written from testing: keep the exact number of legs, arms, cushions and drawers, and keep the direction of the wood grain and the seams. The other routes to a model are compared in how to make a 3D model.
Step 1: Pick the right photo
The best photo shows the whole object, sharp, in soft even light, against a plain background. Nothing should cover it: no cushion over the armrest, no plant in front of a leg.
For furniture, a three-quarter angle beats a straight front shot. From the front, a lounge chair photo hides the depth of the seat. From three-quarters the photo shows the front and one side at once, so less of the shape is missing.

The file has to be a JPEG, PNG or WebP under 4 MB.
Resolution has a floor too. Our upload check rejects a photo whose shortest side is under 400 pixels and warns below 800. It also rejects a photo more than four times wider than it is tall, and one so flat in tone that it is probably blank.
Above that floor, sharpness matters more than pixel count, so we also run a blur check on a small copy of every upload. Test your own photo the same way by eye: zoom to 100% on the edge of a leg. If you cannot see the grain or the weave there, the model will not have it either.
Before you upload, check the photo against this list:
- The whole piece is in frame, with a margin on every side and nothing cut off at the feet.
- The camera was at about the middle height of the piece, not looking down from standing height.
- The edges are sharp at full size, not only on a phone screen.
- The light is even, with no hard shadow cutting across the object.
- The background is plain: a wall, a paper backdrop or a clean floor.
- There is one object in the photo, not a styled room.
Step 2: Remove what is not the object
A busy background is the easiest way to get a wrong model. The tool can read a rug pattern as part of a table base, or fuse a floor lamp with the curtain behind it.
If your only photo is a lifestyle shot, crop it tight to the piece, with a small margin on every side. A long sideboard can stay wide, up to four times as wide as it is tall. Past that, our check asks for a photo that shows the whole product.
Cut-outs help, with one catch. A background remover can leave a pale halo along the edges, and the tool may read that halo as part of the object. Check the edge at full size before you upload.
Shadows count as background too. A hard shadow under a coffee table can turn into a dark slab joined to its legs, so soft, overcast light is worth waiting for.
Step 3: Check the preview from every angle
Good image-to-3D tools show the object from several sides before they build the final model. Look hard at the back and the sides, because that is where the photo did not show the object.
Read the sheet like a contact sheet. Count legs, doors and drawers in every cell, not only in the front one. Then compare opposite cells, such as front-right with back-left: a chair whose arms change shape between them will come out lopsided.
The top-down cell catches what the others hide. A round lampshade that turns oval from above, or a table top that is wider at one end, shows up there first.
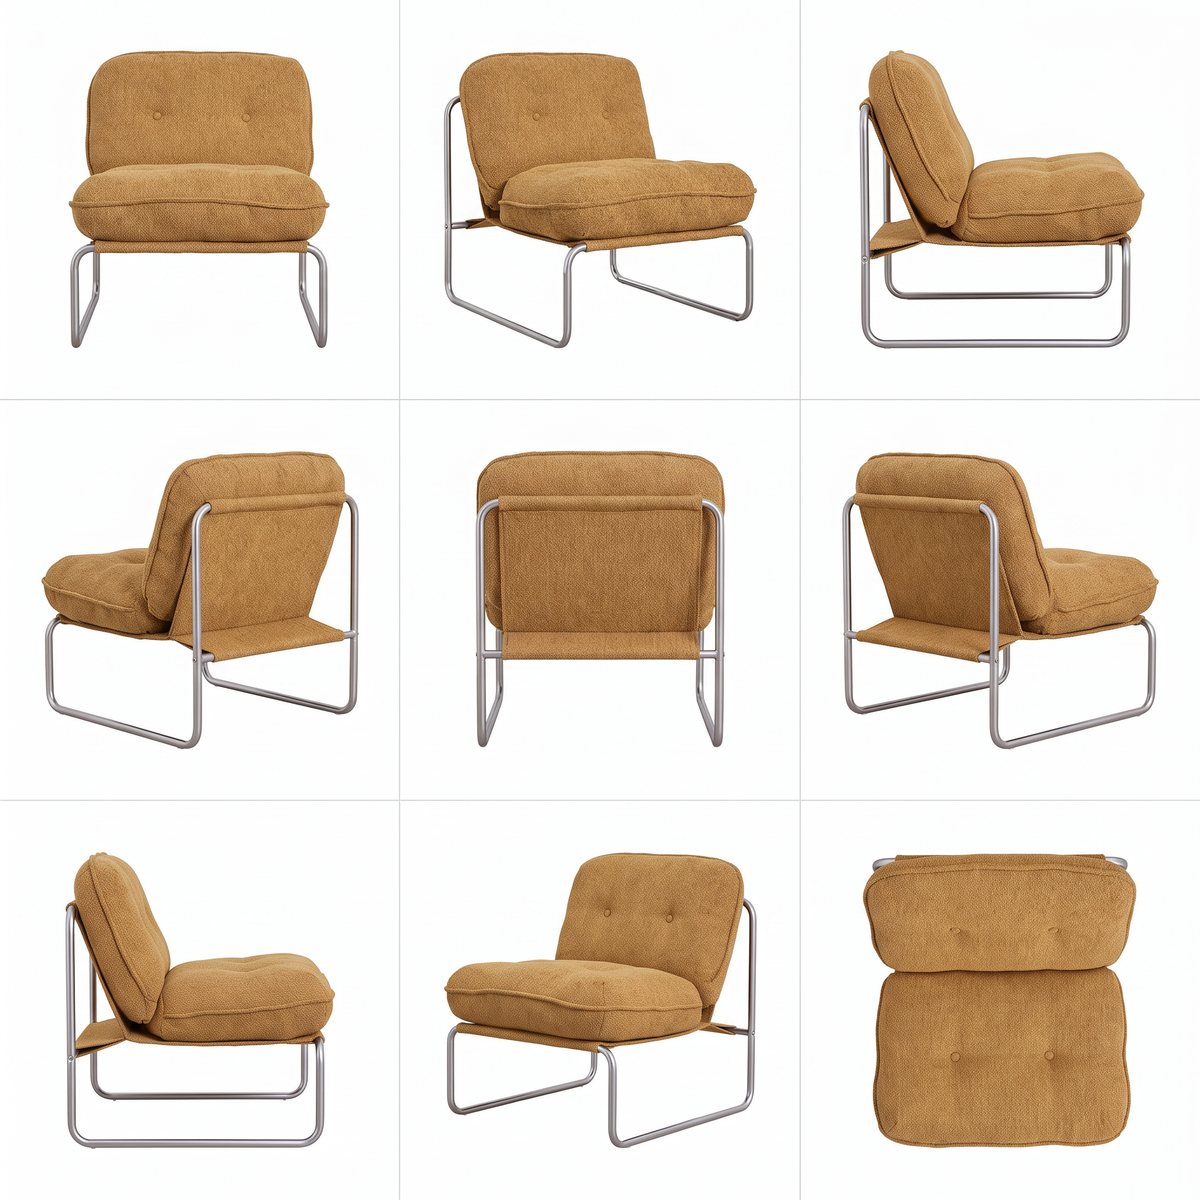
Some failures are caught before you see them. Our checks reject a sheet smaller than 768 pixels, one with the object missing from more than two cells, and one where more than three of the eight turnaround views are near copies of each other.
That last check came from testing. On small greyscale copies, two truly different views of an object differ by 3% or more, and a repeated view by under 1%. A sheet that pastes the photo into every cell gives the build nothing to reconstruct from.
Counting is the check that needs a person. Count the doors, drawers and legs in every cell against the real piece before you build. If the preview is wrong, change the photo or add a note to it rather than trying again with the same input.
easyrender takes a short note with each photo, for facts the photo hides: "four doors", "open back", "brass handles". The sheet above is real easyrender output from the photo in step 1, the preview is free, two a day without credits, and you only spend credits if you build the model.
The free preview carries an "easyrender.ai preview" watermark that the sheet above does not. Upload a photo
Step 4: Build the model and download the files
Once the shape looks right, the tool builds a textured 3D model. Most export GLB, the standard format for the web and Android. Many also give you USDZ, the format iPhones and iPads open in AR Quick Look.
Our build asks for a 2048-pixel texture and returns one mesh with one material, coloured by a base colour image. One mesh and one material are the simplest case for every viewer, and well inside the 10 materials Scene Viewer recommends at most.
The six models on our showcase run from 14,590 triangles for a clay vase to 69,910 for a bedside table with drawers. All six sit under the 100,000 triangles that Google's Scene Viewer recommends as a maximum.
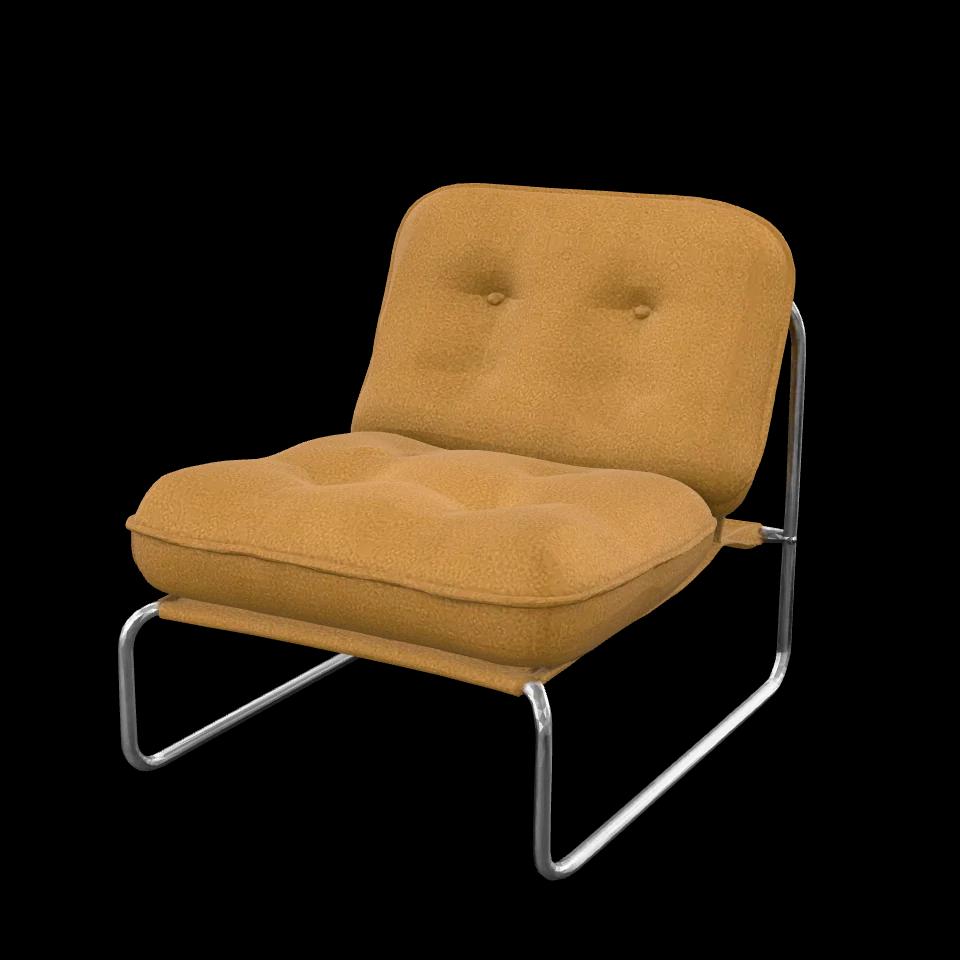
A GLB opens in Blender (File, Import, glTF 2.0) and in free browser viewers such as the Babylon.js Sandbox. In Blender, turn on Statistics in the viewport overlays to read the triangle count. Open the file once before you use it anywhere, and spin it slowly.
easyrender gives you both files for every finished model. The USDZ is converted from the GLB in your browser when you download it, so the two always match. AR is coming soon, and AR viewers place a model at the size stored in its file, so keep the real dimensions in the listing.
What is inside each file is explained in what a GLB file is and what a USDZ file is.
What goes wrong, and how do you fix it?
Most bad models trace back to the photo. This is the list we work through, from symptom to fix.
| Symptom | Cause | Fix |
|---|---|---|
| Upload rejected as too small | The shortest side is under 400 pixels, usually a thumbnail or a screenshot | Use the original file from the camera or the supplier, if it is under 4 MB |
| Upload rejected as too narrow | The image is more than four times wider than tall, such as a banner crop | Crop to the object, with a margin on every side |
| Two chair legs merge into one | From the front, the back legs hide behind the front ones | Use a three-quarter photo where all four legs stand apart |
| Four doors come back as three | Low-contrast seams between the doors | Shoot with light raking across the front, or write "four doors" in the note |
| The back looks the same as the front | The photo only showed the front, so the back follows that view | Write "open back" or "plain back" in the note, or use a photo that shows a back corner |
| Rattan or cane becomes a printed pattern | One photo cannot see through the gaps | Accept it for a small viewer, or scan the piece with photogrammetry |
| Fabric looks yellower or darker than in the photo | The viewer's light differs from the photo's, or the material leaves Metallic unset, so the glTF default of fully metallic applies | Check under neutral light, and set Metallic to 0 in Blender before you publish |
| Surfaces look faceted under side light | A file without vertex normals, for which viewers calculate flat ones, as the glTF spec requires | In Blender, use Shade Smooth and export again |
How do you know the model is ready to publish?
Set the bar before you look, or every model will seem fine. These are the checks we use, and each one has a yes or no answer.
- The counts match the product: legs, doors, drawers, handles.
- The back and the underside look like the real piece to someone who owns one.
- The texture holds up at full screen, not only as a thumbnail.
- The file opens in a browser viewer, on one iPhone and on one Android phone.
- The file fits where it is going. Shopify takes 3D models up to 500 MB, while Scene Viewer recommends 10 MB and 100,000 triangles.
A model that fails check 1 or 2 goes back to step 1 with a new photo or a note. A model that fails check 5 only needs compressing, which the GLB guide covers.
What a model made from one photo cannot do
It does not know the object's real size. If a buyer needs dimensions, write them in the listing.
Fine details come out soft. A small logo on a backrest, thin brass handles or printed text on a box rarely survive. Open rattan tends to become a printed pattern on a solid surface, because one photo cannot show what sits behind each gap.
Glass, mirrors and polished chrome confuse every method, photogrammetry included, because the surface shows its surroundings instead of itself. And these tools model one object at a time, not a furnished room.
FAQ
One, for AI image-to-3D, which predicts the sides it cannot see. Photogrammetry measures every side instead, so it needs at least 20 overlapping photos and often 100 or more for a detailed piece. More photos give truer surfaces, but only if you have the object in front of you and room to walk round it.
At least 800 pixels on the shortest side, and more if you have it. easyrender rejects photos under 400 pixels, warns below 800 and checks every upload for blur. Past that, sharpness matters more than size: zoom to 100% on an edge, and if the grain or weave is not visible there, the model will not show it.
No, photogrammetry measures the object from many real photos, so every surface it shows was seen by the camera. Image-to-3D starts from one photo, so the sides the camera did not see come from that picture. Photogrammetry needs the object in hand; image-to-3D works from a catalogue shot of a piece you have never touched.
Trying usually is; the final file usually is not. Most tools offer a free tier or a free preview, then charge per model or by subscription. On easyrender the angle preview is free, two a day without credits, and a finished model costs 64 credits, which is $0.64 at $0.01 per credit, as the pricing page lists.
Treat it as a model for screens, not for printing. The photo did not show every side, and the model carries no measured size, so a print would not match the real piece. easyrender exports GLB and USDZ for the web and AR, not STL or print files. For a printed part, model it in CAD from real measurements.